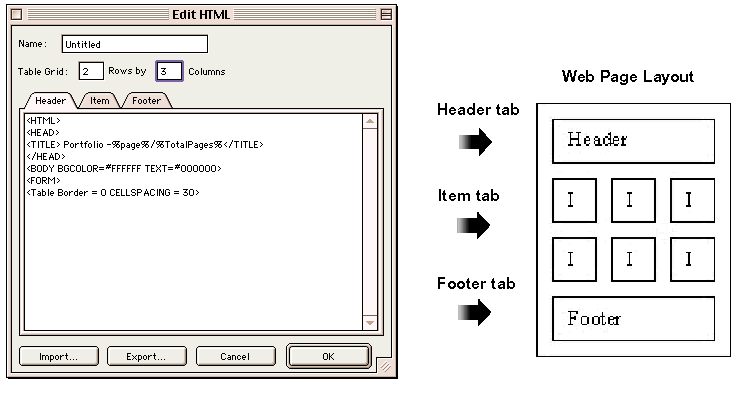
The three HTML data tabs in the Edit HTML dialog represent the three portions of an HTML document (Header, Item, Footer). The Header is the set of tags at the top of the file, the Item is the set of tags written once for each record being written into a page, and the Footer is the set of tags written at the end of the file.
The following rules apply to each block:

The header must contain the <HTML> tag and the <BODY> tag.
Because the grid layout is generated as a table, the Header must end with a <TABLE> tag.
See Export HTML Macros for acceptable macros within the Header.
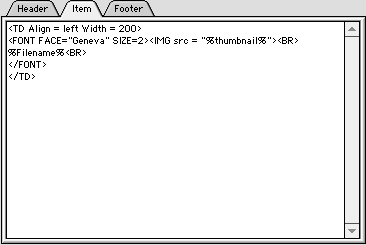
The item tab should contain all of the formatting for a particular table cell, including the opening <TD> tag and the closing </TD> tag.
Portfolio will generate the row tags (<TR> and </TR>) on its own, based upon the grid dimensions. Do not include these tags in any of the cells (unless you are adding your own rows at the top or bottom of the table).
The key to properly configuring the Item tab is in using macros. Please refer to other parts of this section for information on how to use macros.
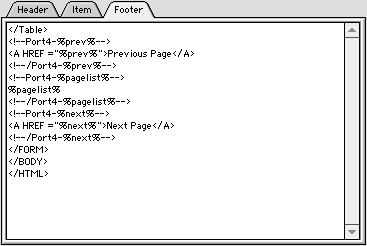
The Footer must start by closing out the table with a </TABLE> tag.
The Footer should close out with </BODY> and </HTML> tags.
See Export HTML Macros for acceptable macros within the Footer.
Portfolio uses a macro language in the HTML Templates to allow for substitution of variable data at the time the HTML files are actually generated. All macros start and end with a % sign, so the proper use would be %macro%. To display a “%” sign in the actual HTML, use two consecutive % signs in the template (i.e. “%%” in the template produces one “%” in the generated output). The macros are case-insensitive.
The following tables list the supported macros within the different blocks:
|
All Blocks |
|
|
%PREV% |
Link to previous page. This will be the name of the previous file generated in the series of files. If this is the first file in the series, the name of the current file is substituted. Example: <A HREF = "%PREV%">Previous Page</A> Results: A hyperlink ("Previous Page") is displayed. When clicked, it takes the user to the previous page in the generated series. |
|
%NEXT% |
Link to next page. This will be the name of the previous file generated in the series of files. If this is the last file in the series, the name of the current file is substituted. Example: <A HREF = "%NEXT%">Next Page</A> Results: A hyperlink ("Next Page") is displayed. When clicked, it takes the user to the next page in the generated series. |
|
%PAGE% |
Substitutes a number indicating which page in the series is being generated Example: <TITLE>Portfolio Search - %PAGE%</TITLE> Results: The text "Portfolio Search – 1" is displayed in the title bar of the browser window. (Assuming this is the first page in the series and assuming this tag is placed in the header prior to a <BODY> tag.) |
|
Item Block Only |
|
|
%THUMBNAIL% |
Substitutes a relative path to the thumbnail file for the current record (located in the Images subfolder). This is most commonly used to display the thumbnail on the page. Example: <IMG SRC = "%THUMBNAIL%"> Results: Thumbnail is displayed on the web page. |
|
%FIELDNAME% |
Substitutes text data from the named field in the current record. For multi-valued fields, the text will be displayed as comma-delimited values (the same way it is displayed in Thumbnail view). Example: <B>%FILENAME%</B> Results: "image001.jpg" is displayed in bold. (Assuming the record’s filename is "image001.jpg".) |
|
%FIELDNAME^x% |
Substitutes the value x from a multi-valued in the current record. If there are less than x values in the field, an empty string is substituted. x can only be a value between 1 and 9. The primary use of this field is for URLs. Example: <A HREF=%MYURL%^2>%MYURL%^1</A> Results: A hyperlink is generated in which the source is the URL value of the field (i.e. the second value in MYURL), and the text displayed on screen is the title value (i.e the first value in MYURL.) |
|
%FIELDNAME%@x |
Substitutes text data from from the named field in the current record. However, the data in the field will be displayed as either a drop-down list or a scrolling list box. This macro is intended primarily for multi-valued fields. Substituting a value of 0 for x results in a drop-down list being generated. Substituting a value of 1 through 9 for x results in a scrolling list box of x lines being generated. Example: %KEYWORDS%@0 Results: The keyword list for the record is displayed as a drop-down list, with the first keyword displayed. Example: %KEYWORDS%@5 Results: The keyword list for the record is displayed as a scrolling list box that is 5 rows in height. |
Technical Notes on Exporting HTML
Using the %fieldname%@x makes use of two different form controls (the drop-down menu and the scrolling list box). Because of this, the page must contain a <FORM> tag for these tags to be interpreted properly.
The <FORM> tag can be either in the Item block or in the Header. If you plan to have a separate set of form controls on the page, put the <FORM> tag towards the beginning of the item block (usually just after the <TD> tag) and the </FORM> tag towards the end (usually just before the </TD> tag). This will prevent the controls from accidentally causing data to be submitted via your Submit control.
To display a large text box for a multi-line field, wrap the field in a TEXTAREA tag.
Example: <TEXTAREA COLS=50 ROWS = 3 WRAP ="SOFT" NAME="Description">%Description%</TEXTAREA>
Results: This will cause a scrollable box 3 rows by 50 characters to be drawn with the contents of the record’s Description field displayed. Note that this is also a FORM control, so the previous note regarding FORM tags applies here as well.
As with any HTML code, results will vary based on what make and version of browser the viewer is using. It is recommended that you test the generated results with any browsers with which you anticipate your visitors might access the pages.
Tip: For more information on the specifics of creating pages for the Web and coding in HTML, consult any of the excellent tutorials and reference guides available on the Internet, or check your local bookstore or library for additional information.